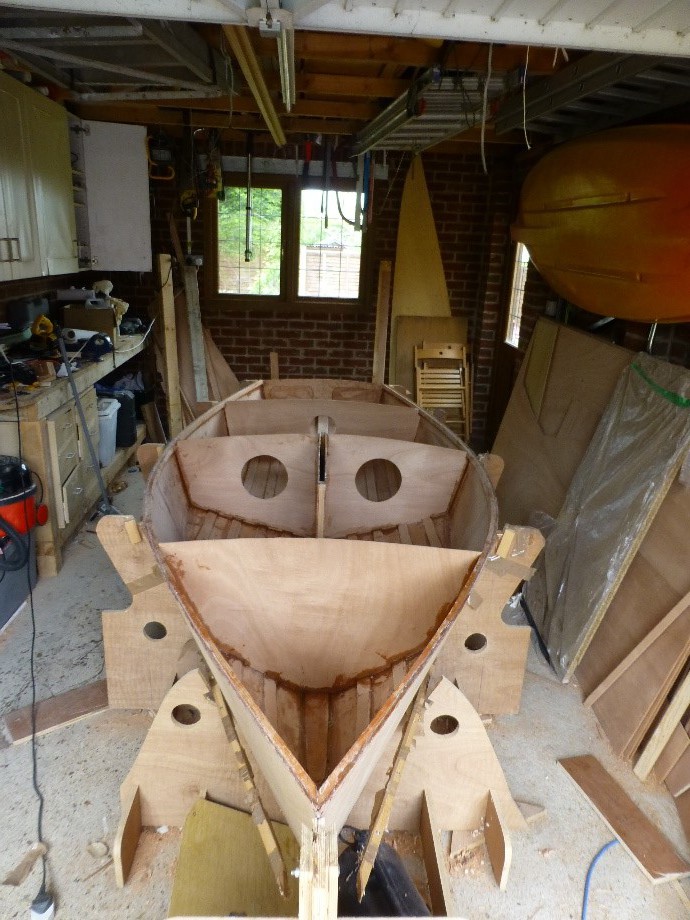
As we headed into 2016, work continued to complete the jig. Stringers were added for the chines and gunwhales and the whole jig was screwed to the floor and trued up.
Then I measured the whole thing again and was still happy that the dimensions were ‘OK’.
Did I mention in chapter 1 that ‘CNC’ means ‘Computer Numerical Control?. With the CNC cut panels from the professional designs, the panels should be a perfect fit into the jig. With the AHC panels (Andy’s Hand Cut) each panel must be individually fitted into the jig, so a couple of sheets of 4mm plywood were ‘cut to waste’ as I templated the hull panels. Very time consuming. Luckily, the joints did not have to be that tight due to the epoxy filleting techniques used to build modern wooden dinghies. I was pleasantly surprised to find that the port and starboard side panels were virtually the same size and shape, which suggested that the jig was symmetrical.
Once I was happy with the templates, the panels were roughly cut out and then ‘scarfed’ together to the required length. It took several attempts until I was satisfied. I later realised that I had put my rather ugly scarfe joint in the bottom panels in the middle of the cockpit floor, which was the main reason that the floor of the cockpit is now finished with grey non-slip paint.
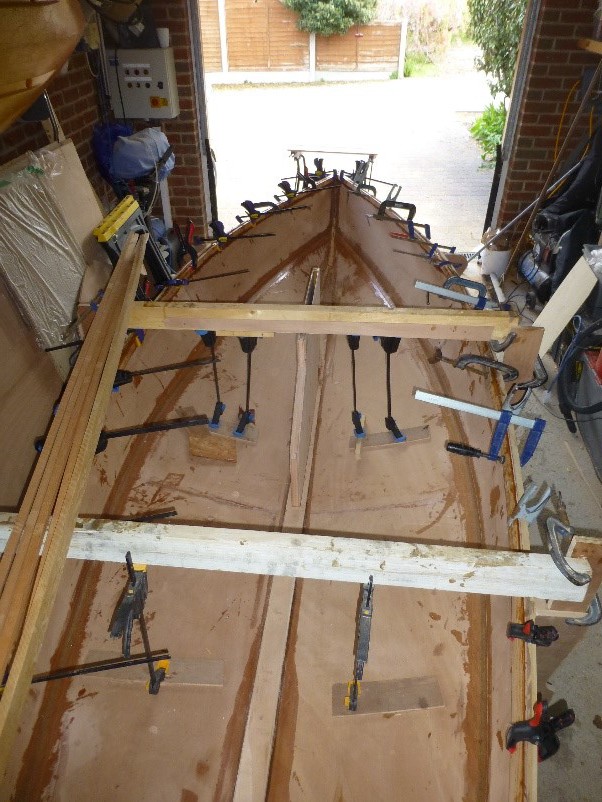 When I built my first boats we had ‘g’ clamps and ‘sash clamps and not much more. These days there is a wonderful selection of clamps available including single handed clamps of various types. And what is even better is that some can be configured to expand as well as contract.
With timber beams across the top of the jig, these expanding clamps could be used to push the panels down onto the jig. At this point I discovered that there was no way I was going to persuade the plywood bow panels to go down onto the additional ‘station 4’ that I had put in the jig in the hope that I could add some extra fullness in the bow area. Eventually I cut the station back and let the panels form their natural shape from ‘station 3’ to the bow
With epoxy ‘glue’ you don’t need the large clamping pressures needed by the ‘old fashioned’ waterproof glues we used to use, like Aerolite 306 and Cascamite, so today simple spring bulldog like clamps are often sufficient (and cheap).
Quick question. ‘How many clamps do you need to build a boat?’ Answer later.
Historical note. I used literally gallons of aerolite 306 when I built my’ Twister’ back in the 1980’s. Even more historical, Aerolite 306 was originally developed to glue the plywood ‘Mosquito’ aircraft together in WW2. It’s still available today. (the glue, not the plane). Of the 8000 built, two Mosquito’s are still flying.
And even more irrelevant to OK building, there is a famous speech from Herr Goering which goes ‘In 1940 I could at least fly as far as Glasgow in most of my aircraft, but not now! It makes me furious when I see the Mosquito. I turn green and yellow with envy. The British, who can afford aluminum better than we can, knock together a beautiful wooden aircraft that every piano factory over there is building, and they give it a speed which they have now increased yet again. What do you make of that? There is nothing the British do not have. They have the geniuses and we have the nincompoops. After the war is over I’m going to buy a British radio set – then at least I’ll own something that has always worked.
Sorry, back to the present.
To avoid the risk of the epoxy seeping through the hull panels and bonding the hull to the jig, the whole of the inside of the jig was covered in brown parcel tape which the epoxy won’t stick to.
At this point I had to order my first batch of epoxy and my financial commitment had just rocketed. Someone later asked me how long it had taken to build the ‘OK’ and I said probably about 400hrs. This was mostly made up of thinking time. So before gluing the first panels, I thought some more, measured some more and finally started epoxying.
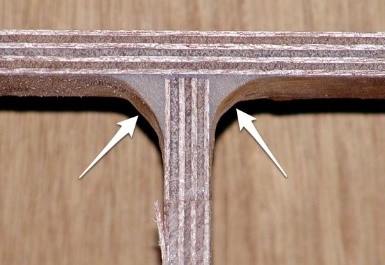 The bonding method used was the epoxy filleting technique. You coat each face to be bonded with neat resin and let that soak in a bit while you add micro fibres and fillers to give an appropriate mix. ‘Micro fibres’ are actually cotton fibres and the fillers in this case was fine sawdust.
The mix is then pushed into the joints and faired to form a smooth surface. Don’t think mine were as neat as this picture, but like all things you get better with practice and the other beauty of the ‘OK’ is that most joints are never seen again once completed.
Next job was the centreboard case. This was fabricated from 6mm plywood and was designed for a 20mm centreboard, the maximum thickness allowed, although many now opt for slightly thinner boards, even down to 15mm.
The shape of the centreboard is defined by a strict plus or minus 5mm on the drawings, but I built the board much later so I just cut out a template to play with. The maximum depth of board below the keel is also strictly defined. The height of the bolt is not dimensioned but must allow all the board to retract fully into its box. I probably erred on the safe side and put the bolt a bit to high but the advantage was that the leading edge of the board could move forward and be a bit more vertical when fully down. Several coats of epoxy was applied to the inside faces of the box before joining it together as once completed it would be nearly impossible to maintain.
To secure the case into the boat I laminated a ’hog’ from several strips of plywood with, a slot cut out for the case. This was bonded one hot day and had to be done quickly. I later found out that at least one of the mixes of epoxy had gone wrong and not set. I think I forgot to add the hardener or perhaps mixed the wrong proportions, something I know I did later a couple of times. Frustrating, as you then have to remove a sticky mess and start again. With the hog, I had to remove as much as I could and hope for the best, even resorting to screws to hold it all together.
 Next bits were the floor stiffening. The ‘OK’ rules say that any stringers must run the full length of the boat. I wanted a stiff cockpit floor so decided to run 9mm ply stiffeners through the boat. It added a fair amount of weight but had the bonus of strengthening my scarf joints.
Transom and station bulkheads were templated and then fitted and in true ‘belt and braces’ style all the joints inside the boat were then gone over with glass fibre tape.
Last jobs in this phase was to fit the inwhales and other stiffening and the boat could be released from its jig, which I did on the 13th May 2016. Then it was time to head back to the Baltic to play with my other boat so worked stopped until July.
And the answer to the clamp question is ‘two more than you have got’ although at the end I probably did have enough. Just counted and I have ended up with 50.